Thursday, May 3, 2012

Easy to Grow Herbs


Nothing beats the taste of fresh herbs. And if these herbs are from my garden...its even better. Everytime, I pinch off  few mint leaves to garnish a tall glass of nimbu paani or grab a stalk of basil from my garden for some fresh pesto, it gives me a small sense of pride. Its so easy to grow herbs! Here is a list of herbs that can be grown in your garden or patio for some instant bragging rights.

Couple pointers :
1) Most herbs are happy when grown in a pot. Be careful when putting mint or other invasive herbs directly in the garden, these will take over your yard and kill everything in sight.
2) Plant perennials and annuals in different beds.
3) Buy smaller plants which are much cheaper. They'll grow huge within few weeks.

Easy to Grow Herbs:
Basil: YEP ! you need one. Don't even think twice..it will pay for itself. Annual. Generally, if you cut from the top, you'll encourage bushier growth of your plant. If you cut from the bottom or sides, you'll encourage a taller, more slender plant. Don't chop more than one-third of total growth at any one time. Pinch off any flowers to stimulate growth.

Mint: Grow this herb in a container.  Super hardy and invasive. Try chocolate mint ( Yum), pineapple mint or peppermint. Do not over water.

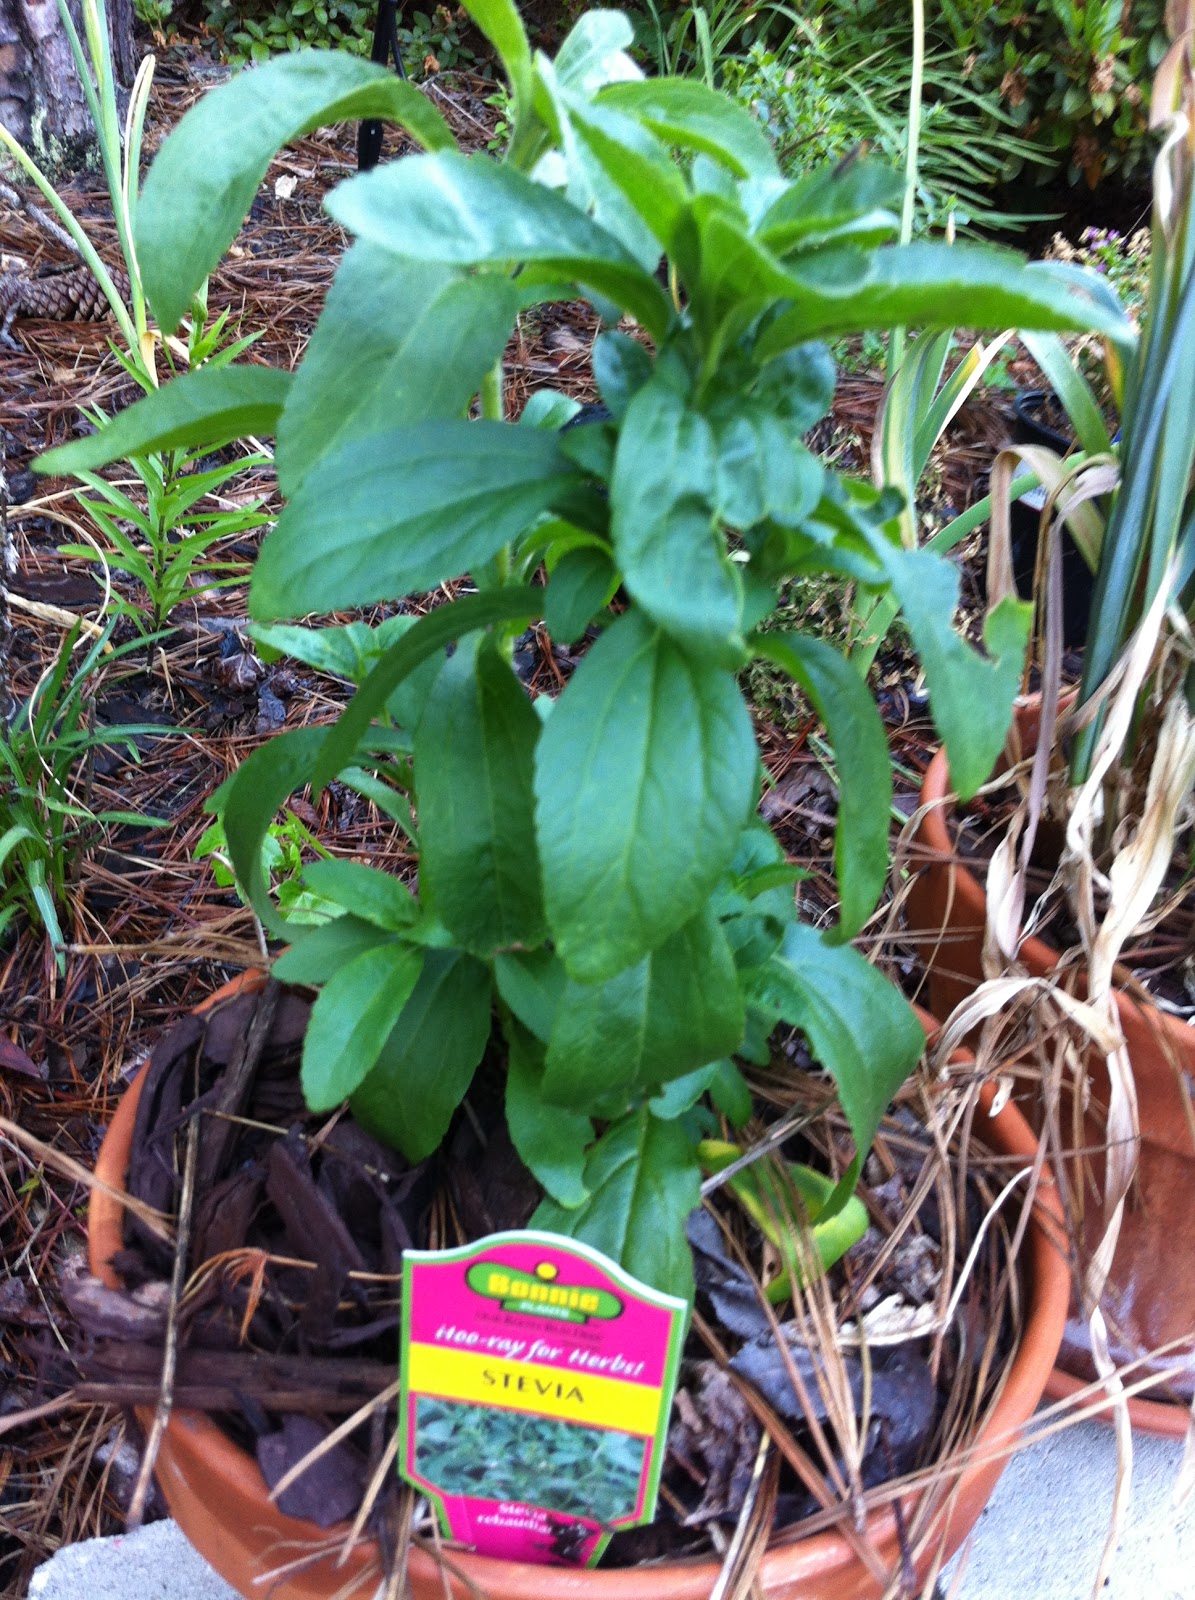
Stevia: Never heard about this one ??? Leaves have a sweet taste. Literally, pinch a leaf and chew on it. Natural sweetner. Noncarcinogenic unlike artificial sweetners. Leaves can be used fresh or dried. Give this herb some room to grow, it loves to spread out. Annual. Sidenote, Truvia is made from Stevia extract.

Rosemary: Workhorse. Newbies should start their gardening adventure with this herb. Super hardy, drought tolerant ( it actually hates too much water), fragrant, evergreen, perennial. No baby sitting required.

Thyme:  Another workhorse herb. Super hardy. Perennial- comes back strong year after year. Survives freezing temps. Do explore lemon thyme and lime thyme herbs. A keeper in your garden.

Lemongrass: Its a grass so definitely pot this one. Stalks have mild lemony flavor. Also a great insect repellant. Annual but it can survive mild winters with heavy mulching. Perfect for a cup of Gavati Chaha-herbal cleansing tea.

Sweet Bay/Bay Laurel: A distant cousin of Tejpatta. Leaves have spicy flavor. Evergreen fragrant leaves you can pinch off even in winter. Slower growth. Can be potted or planted in the ground.  During winter protect in ground plant from snow.

Oregano: Oregano spreads like mint. Perennial. Strong comeback every year. Thrives in  poor soil and less water. Newbie, are you taking notes? This one should work for you as well.

Herbs that need babysitting...but you will still love them:

Dill and cilantro: Goofy herbs. These are cold weather herbs- good for early spring and fall. With higher temperatures, these will bolt early i.e. leaves become feathery and seeds develop. For southern gardens, cilantro and dill may work in partial shade with heavy mulching. But prepare yourself for droopy plants that die mid summer. Side note, Cilantro does not like to be transplanted.

Curry Leaf Plant/Murraya koenigii: I'll fess up, I have killed one curry leaf plant by leaving it outdoors during winter. From what I read, this plant cannot tolerate temperature lower than 55 degrees. Grows well in Zones 9-11. All other zones need to bring the plant indoors during winter. Plant may or may not survive depending on humidity levels indoors. Sadly, this one is not for me. I'll continue to buy sprigs of curry leaves from my Indian grocery store.

Do you have any fav herbs??


Monday, April 16, 2012

Ahh Spring is here !!!

For the past few months, I lost all enthusiasm to update my lovely blog ...horror !!!. I guess I was waiting for the warm spring sunshine to inspire me. So here I am back with some pictures from my precious little garden.

I started gardening 6 years back. We got someone from craigslist to install and fill a 4 X 8 raised bed. Best $120 investment ever! I later added tons of containers/pots with herbs, flowers, veggies and even fruit trees (!). Container gardening is ideal for someone with limited space such as condo balcony or for someone like me with a shaded backyard. You can easily move containers in sunny spots around your yard. Additionally, with pots there is no need to  amend native soil which can be very expensive.

Yes, during my gardening adventures I have killed MANY plants and learnt some very valuable lessons. Here is a list of my 'lessons' to help those newbies with a shovel in their hand and a produce-filled bucket in their dreams.

1) Mulch your vegetable patch atleast 2-3 inches thick. Georgia heat is super intense and roots need protection from the heat. This also reduces watering need.


2) When I repot an old container or til my patch, I add soaked shredded cardboard, like packing boxes etc. Soaked cardboard attracts worms and they are natures little workers that keep plants happy. Newspaper is not a good idea because the ink leaches into the soil.

3) Always buy two or more cucumber, squash, beans and peppers plants. This helps in cross pollination and you get more produce.

4) If you don't have birds & bees in your garden, there will be no pollination and therefore no fruits. Hang a hummingbird feeder or keep a birdbath next to your patch. I have a bucket of water next to my vegetable patch, this greatly reduced the number of half-eaten tomatoes by squirrels when they are thirsty. Besides, you will see some amazing birds gather around the 'watering hole' ..Quite a sight !!!!

5) Vegetables, container/potted plants need to be fertilized every month with safe fertilizers. Organic fertilizers such as EB Stones, bottled fish emulsions are amazing but it smells bad. Also look out for the NPK number on the fertilizer box, it looks something like 12-10-8. N=Nitrogen produces healthy leaves, K=Potassium and P=phosphate are required for producing and ripening of fruits. So more nitrogen during spring to get the leaves started and more P & K during summer months for fruits.

6) All plants LOVE banana peels, just scratch the surface and tuck peels near the roots.

7) Most of  GA falls under zone 7( yes, we have been rezoned-Marietta is 7a). Buy plants that are zone specific. I once planted a lilac and it died within a month, broke my heart, I tell you. Then a kind person at Pikes told me about a lilac variety called 'Miss Kim' that is heat tolerant and more suitable for Zone 8. My lilac is thriving now. Local nurseries will have zone specific varieties compared to box stores like HD or Lowes.

8) Stake tomatoes, beans & cucumbers when you plant them. This allows the roots to form around the stake and is much easier to do when plants are itty bitty. If you try to stake after the plant is vigorously growing, you will end up damaging the roots and the plant will drop all its fruits & flowers. Yep, I have done that before!

9) To keep squirrel and rabbits away from my veggie patch, I spray red fox urine near the patch.( I know sounds gross)  It comes in a spray bottle. Works every time !!!

10) To help plan your vegetable patch here is a brief list of companion plants. http://en.wikipedia.org/wiki/List_of_companion_plants


Eye candy from my garden.


Tuesday, January 3, 2012

Toddler Lunch 28


Today's Daycare Lunch Bag:


Snack # 1: Blueberries and sweet red apple wedges


Snack # 2: Pack of raisins and honey graham sticks from Back to Nature ( contains no artificial preservatives, flavors, colors  or hydrogenated oils)


Lunch: Pesarattu ( moong dal ) dosa with ketchup. My son loves to eat dosa with ketchup...what can I say!


Pesarattu is a green moong dal crepe that is savory, high in protein content and easy pesy to make in the morning. Soak overnight 1 cup of split green moong dal and 1/4 cup of rice. Adding rice to the batter makes crispy crepes.  Next morning, grind the soaked mixture with chopped fresh ginger, cumin seeds and salt. Batter consistency should be like a pancake batter. Pour 1 laddleful of the batter on a greased pan and spread it around in a circle to make a thin layer. Cook for couple minutes and flip the dosa to cook the other side. For grown-ups, add  chopped green chilies and onions for some heat and flavor before you grind the batter. Delicious !

Recently, I got a number of emails from non-Indian readers asking me to upload pictures of ingredients mentioned in my blog that are not usually found in regular grocery stores. I have included a picture of split green moong dal which can be purchased at any Indian store.


Thursday, December 29, 2011

Moroccan Oil- Secret to Gorgeous hair


I have been using Moroccan oil for a year now and I can safely say that this fantastic product is filed under my 'Must Have' list. Let me tell you, this is one of the best kept secret of expensive salons. So what is it.....uggg? Its a rich golden oil that makes my hair healthy, silky smooth and shiny. Now don't you cringe when I say oil, keep on reading and you'll know why I love it......

Here is the product website : http://www.moroccanoil.com/


Moroccan oil contains a proprietary blended Argan oil that is extracted from the kernels of argan fruit found in Morocco. Argan fruits look like olive fruits and yield a dense oil. This rich golden liquid is loaded with anti-oxdiants which repaires and revitalizes limp, dried and stressed hair. Especially, if you color or apply heat treatment to your hair, this product works like magic in restoring hair structure. A single pump is sufficient for medium lenght hair.  Oil is quickly absorbed so no more yucky mess on my pillows...woohooo. It does have a mild fragrance. After the oil is absorbed, my hair has a very faint exotic smell.  !!

There are many products that have argan oil, but I continue to love Moroccan Oil products. This luxury brand  makes a whole range of hair care products from shampoos, conditioners, mousses, hair sprays, hair masks and products to address dry or oily scalp. You can buy them from salons listed on the website. I have also seen these products listed on Amazon and eBay. However, be cautious about diverted or counterfeited products when buying from online sources.

How to use it: Oil can be applied to wet or dry hair. Small amount applied to wet hair can reduce drying time by 40%.  Apply dime size oil to wet hair. Let it sit. Dry and style as usual.

Product comes in 3.4Oz bottle ( with a pump) which lasts for about 6-7 months since very little is needed. I purchased it from my salon for $30+tax.

Ingredients:
Cyclopentasiloxane, Dimethicone, Cyclomethicone, Butylphenyl, MethylPropional, Argania Spinoza Kernal Oil (Aragan Oil), Linseed (Linum Usitatissimum) Extract, Fragrance Supplement, D&C Yellow-11, D&C Red-17, Coumarin, Benzyl Benzoate, Alpha-Isomethyl Ionone


Thursday, December 22, 2011

Marbled Fudge Bars- brownie & cheescake in a single bite


First, I need to apologize for being MIA. Yes, personal & work 'to-dos' were multiplying like bunnies which is why I could not devote time to my beloved blog. But no worries, here I am and I have a gem to share with you.

Close your eyes, think of Christmas (heck, think of any holiday) and what do you itch to eat....ummm something sweet..ofcourse !

For this Christmas, I am sharing an amazing marbled fudge bar recipe from a guest cook. These bars are moist, chocolaty ( made up word), creamy and perfect with a cup of coffee on a cold afternoon.  Mind you, I have not tried this recipe in my kitchen. But a superb cook made a huge batch of these bars, wrapped them lovingly and gave it to a few lucky ones, like moi. Terri T. thank you for letting me share your recipe.

To make eggless version of these bars, you can use egg substitues. However, to get the richness and texture of a fudge, you may want to check out these eggless baking tips.


Marbled Fudge Bars

Preparation time: 30 minutes, plus cooling
Cooking time: 45 minutes
Makes 15-20

Ingredients:
8 oz unsalted butter, cut into chunks
7 oz dark chocolate (70% cocoa solids), chopped
1 lb caster sugar
3 large eggs, lightly beaten
4 oz plain flour, sifted
1/2 tsp salt
1 tsp vanilla extract

For the topping
 8oz cream cheese (full-fat)
4 oz caster sugar
1 egg, beaten
1 tsp vanilla extract

You will need
13 X 9 pan/tin, bottom and sides lined with baking parchment

Method:
1) Heat the oven to 350F
2) Melt the butter and chocolate in a bowl set over hot but not simmering water.
3) In a separate bowl, whisk sugar and eggs until well blended. Stir in flour, salt, chocolate mixture and vanilla extract and then spread this mixture on to the bottom of the tin.
4) For the topping, beat cream cheese, sugar, eggs and vanilla extract together and spoon this on top of the chocolate mixture.
5) To create a marbled effect, swirl the tip of a cutlery knife through the mixture, making sure you drag the dark brown chocolate and white cream cheese mixtures through each other to leave a swirling pattern.
6) Bake for 40-45 minutes until the top feels firm to touch. Leave to cool in the tin and then transfer to the fridge to cool completely before using hot knife to cut it into bars. Keep these stored in the fridge for 3-4 days.

Cook's tip: These are really sticky, so you must use baking parchment to prevent sticking, and use a hot knife to cut them into bars.


Tuesday, September 13, 2011

Chicken Malai Kabab

Who doesn't like chicken malai kabab??? If you are a carnivore, you have to try these kababs. 'Malai ' means creamy so these kababs are spicy, soft and utterly creamy. If you end up with  leftover kababs ( that is a Big if),  wrap them in a fluffy Kawan parantha, throw in some chopped onions and green chutney...viola !....delish meal all set.

Most Peshawari recipes use raw papaya or yogurt as a tenderizer. A tenderizer breaks down the meat, cuts down grilling time and gives the kababs its unique 'melt-in-your-mouth' texture. I use an unseasoned tenderizer ( available in Publix spice aisle) because it acts quickly and lets me control the salt amount.  Regardless of the type of tenderizer you choose,  I would suggest that you do not skip the tenderizer in this recipe because you need the meat to be buttery soft.

The other important point to note is to eliminate water at every step. Ingredients should be fairly dry for the marinade to stick to the meat throughout the cooking process. This is true for all kababs including grilled paneer. Stay tuned for grilled paneer recipe ....

Ingredients:
2 large boneless chicken breast
1 tbsp pepper powder
1/2 tsp garam masala powder
1 tsp tenderizer ( or follow directions on the container)
1 tbsp ginger garlic paste ( squeeze out the water)
1 cup of cilantro leaves
4 green chillies ( adjust per taste)
1/2 tsp cumin seeds
1/2 tsp coriander seeds
2 sprigs of mint leaves
1tbsp sour cream
1 tbsp cream cheese
melted butter for basting
chat masala
lemon wedges
Salt to taste
Sliced onions and green peppers optional

Method:
1) Preheat oven to 425 degrees.
2) Wash and pat dry the chicken breasts. Cut into similar size chunks for even cooking. In a bowl mix chicken chunks, salt, pepper powder, tenderizer, garam masala and ginger garlic paste. Set aside for 15 minutes.
3) In a mortar, pound together cilantro leaves, mint, cumin seeds, coriander seeds and chillies to a coarse paste. Do not add water.
4) To the above paste add cream cheese and sour cream( discard the whey/water content). Add in the marinated chicken pieces. Let it sit for 15 minutes. If using yogurt/ papaya, marinate for  4-5 hours.
5) Skewer the chicken pieces and brush with melted butter. In a casserole dish layer onions and green peppers. For easy clean-up, line the casserole dish with aluminium foil before layering the veggies. Hang the skewers in between the two sides of the casserole dish such that the yummy drippings from the kababs will be caught by the layer of veggies as it cooks.
6) Grill for 10 minutes. Remove, baste with butter. Turn and grill the other side for 5 more minutes. Cooking time depends on the size of the chunks.
7) Remove from the skewers carefully, sprinkle with chat masala and lemon juice. Enjoy..!


Monday, September 5, 2011

Ukadiche Modak- Ganpati Bappa Morya

 I first experimented with  ukadiche modak  when I was pregnant. I insanely craved for these soft, sweet and steamed dumplings. Having never made modak before and having heard enough horror stories about making these yummy treats, I was skeptical about my success. After much thinking, my cravings won !!! And there I was with a big batch of Ukad and  sweetened coconut filing. Long story short, that day I feasted on  a plateful of  little balls that did not look like conventional modak at all but the taste was heavenly, I tell you.  Moral of the story,  yes the shape is difficult to master but don't let it deter you. Give it a try. Ofcourse, never forget the magic of  a good mould. Note to myself, get a modak mould on my next trip from India

Modaks are usually eaten during Ganesh Chaturthi, however there is no rule not to make these delightful parcels to celebrate your special day.


Here is my mom's recipe :

Ukad ( White dumpling cover)
1 cup of rice flour
1 cup of water
1/2 tsp salt
1 tsp ghee

Filing/Chav
2 cups of grated coconut ( frozen)
1 cup of grated jaggery
1 tsp roasted poppy seeds
1/2 tsp rice flour
1 tsp ghee
1/2 tsp cardamom powder
chopped almonds, cashew nuts and raisins optional
pinch of salt


Method:
To make the filing:
In a microwave safe glass bowl, mix grated coconut and jaggery. Heat at high for 3 minutes. The jaggery will start to melt. Add all the other ingredients and microwave for another 3 minutes until the mixture is dry and smells amazing. Set aside to cool


To make  Ukad:
 Bring water to boil. Add salt and ghee. Slowly add rice flour and stir.  Sprinkle some water, cover and let the dough steam for a minute. Empty the dough on a plate and while warm ( take care not to burn yourself) knead until the dough becomes soft and pliable. Cover with a damp towel.


To assemble the dumplings:
1) Here is a simple trick, break out a small amount of dough and place it between two plastic sheets. The dough is so soft that if you place a flat bottom plate with enough pressure, the dough rolls out into even thickness. This is much easier than the traditional way to  shape the dough with your fingers.

2) Grease your palms well. Hold the rolled out dough in the cup of your hand. Spoon 3/4 tsp of the filing in the dough cup. Oil your fingers. Pinch folds on the side. Bring all the pleats together to close the opening with a peak.

3) Steam the dumplings for 15 minutes. I used an Idli steamer but you can use a pressure cooker without weights or a bamboo steamer.

 How to eat  Modak: Yeah...like you need instructions for that ..!!!


Tuesday, August 2, 2011

Toddler Lunch 27

Back by popular demand   :)


Today's Daycare Lunch Bag:


Snack # 1  Blueberries and cut up Apriplum ( sweet hybrid fruit of Apricot & Plum ...check fruit aisle in Publix)


Snack # 2: Babybel mini cheese and Annie's cheddar bunnies (yummy !!!!)


Lunch: Cilantro and carrot appe with ketchup


Appe are bite size shallow fried spherical vadas that are eaten with coconut chutney or ketchup. Perfect for breakfast or snack. You can make different variations using  vegetables or totally skip vegetables and add chopped green chillies for the bigger kids. You will need an appe patra which is available in few Atlanta Indian stores. This little gadget can be used to make koftas and vadas for dahi vada.


The batter is made of 1 cup of urad and 1 cup of rice. Soaked for 4 hours. Grind and ferment it overnight.
 Next morning, add chopped cilantro, cumin, salt, dash of sugar and ginger. This is an easy way to sneak in any chopped vegetables such as carrots and broccoli in the batter. Place the appe patra on the stove top. Pour little oil in the wells and then pour the batter. Shallow fry golden on each side.  


Friday, April 8, 2011

Bloom Time

Spring is here and my plants are starting to peek out. Exciting !!!!

Past winter was particularly harsh in Atlanta. We had snow that lasted for a whole week which is very unusual. I was quite sure that my peonies, Jasmine, french lavender and tulips were dead by now. But nature is kind and its amazing to see all my plants happy and ready for the summer display.


Last weekend we installed a drip irrigation system for my vegetable patch and containers. Our existing in-ground sprinkler system did not cover the vegetable garden which meant watering the patch EVERYDAY. Not fun. Back to the drip irrigation, this is a great DIY project which is good for the plants and also saves gallons of water. Here is the online store from where I ordered the kit.


Pictures from my garden:

Azalea bursting with color


First batch of annuals ready to go in the ground


Shrimp plant


Celeste Fig- Ready to be repotted- atleast for few years 


Tulips


Lilly of the valley- Fragrant perennial

Bowl of Cream peony-perennial 

Meyer Lemon blossoms- Potted will bring in house in winter

Creeping Phlox- perennial dash of color


Evergreen Fragrant Spirea


Wednesday, April 6, 2011

Toddler Lunch 26

Today's Daycare Lunch bag:


Snack # 1 Juicy pear spears and blueberries.


Snack # 2 Dried raspberries and vegetable thins.


Lunch: Store bought humus, mozzarella and spinach on Italian multi grain bread. I drizzled some honey since Y does not like sour taste.


Wednesday, March 9, 2011

Happy Memories


Its amazing what vacation can do to your soul. I came back from a relaxing vacation to India, all refreshed and ready to take on the world. Needless to say, I also ate and ate and ate some more......


While we were in Mumbai most of the time, we took 'vacation mein vacation' ( this is for all of you who have seen the infamous Parag saree ad.... 'saree mein saree') spent few days in the gorgeous state of Goa.


We have been to Goa a number of times. But this trip was special since four generations were vacationing together. I managed to click a picture of my toddler with his great-grandfather, watching the sun set over the Arabian sea...priceless !

Here are some beautiful memories of my trip.


Tuesday, January 18, 2011

Toddler Lunch 25

Today's Daycare Lunch bag:


Snack #1: Cut up juicy nectarine and blueberries


Snack #2: Raisins, whole wheat crackers with flax seed ( from Whole Foods),  cranberries & chocolate cookie (Cookies were made by Locks see her blog The Rich Vegetarian)


Lunch: Artichoke hearts, spinach and cream cheese triangles made with Pillsbury crescents. I also added some ranch dressing and dash of Italian seasoning to the mixture. Tomato ketchup to dip and enjoy.


Tuesday, January 4, 2011

Toddler Lunch 24

Today's Daycare Lunch bag:


Snack # 1: Blackberries and strawberries.


Snack # 2: Wheat thin crackers in garden veggie flavor along with freeze fried sour cherries from Whole Foods.


Lunch: Whole wheat pasta shells, onions and peas in sun dried tomato cream sauce. My dear friend SG made this yummy pasta and Y loved it. To make this pasta, I sauteed one clove of garlic, chopped onions, peas, sun dried tomatoes and a dash of Italian seasoning in olive oil for couple minutes. Add cooked pasta and some heavy whipping cream. Top with shredded mozzarella.

For adults, try adding more robust flavored cheese such as smoked Gouda, capers and a heavy pinch of fresh ground pepper.


Thursday, December 30, 2010

Toddler Lunch 23

Today's Daycare Lunch bag:


Snack #1: Blueberries and clementines.


Snack #2: Madeleines ( costco), raisins and freeze dried mango chunks from Whole Foods


Lunch: Savory ricotta pancakes with ketchup.
Mix rice flour, ricotta, egg and milk to form a pancake-like batter. Add whole cumin, salt, garam masala and fresh chopped cilantro. Pour a laddleful of batter on greased griddle to make thick pancakes. Sprinkle little chat masala on the pancakes. You can skip the egg, if you do so, increase the flour quantity in the batter.

Tuesday, December 28, 2010

Eggless Linzer Cookies

With a sick child and crazy work deadlines, it seemed ages before I could upload a new post. Not to worry, I am back and this time I have a sweet recipe to share. This Christmas I baked some Linzer cookies to share at my office.

The original cookie recipe that came along with the cookie cutter set included an egg in the mixture. Since we have few people at work with allergies, I made my cookies without any eggs and they turned out great.

A Linzer cookie cutter set looks like this. But you can  use couple small bowls/lids in different diameters to cut out the shapes.


Linzer Cookie:

2 1/2 cups unsifted all-purpose flour
1/2 cup unblanched almonds, finely ground
2/3 cup granulated sugar
2 1/2 sticks of softened butter (unsalted)
1/2 tsp cinnamon powder
1/2 tsp cardamon powder
pinch of salt
parchment/wax paper

To decorate the cookies:
1/2 cup of powdered sugar
1 cup seedless raspberry jam.


Method:
1) Cream butter and sugar for 5 minutes with an electric beater.
2) Add flour, almond flour, cinnamon, cardamon and salt to the butter mixture to form a dough ball.
3) Divide the dough into four equal parts. Sandwich the dough between two parchment/wax paper sheets. Roll it out to 1/8-inch thickness. You will end up with four rolled dough sheets.Refrigerate for an hour.
4) Preheat your oven to 375 degrees.
5) Peel away top layer of the parchment paper. Using a  cookie cutter, cut out small rounds for the bottom part of the cookie. For the top part of the cookie, cut out round cookies with center shapes cut out i.e dainty hearts, stars or little teddy bears. Make sure you have even number of  bottom cookie and top cookie with a cut out to form a sandwich.
6) Bake for about 10-12 minutes. Cool

To assemble the cookies:
1) Dust the top part of the cookie with powdered sugar.
2) Put a dollop of jam on the bottom part of the cookie and now placed the sugar-dusted top part of the cookie to form a perfect sandwich.

Enjoy !